La siguiente guía fue preparada en inglés con fines académicos.


Census and Survey Processing System (CSPro)
Definition.
“The Census and Survey Processing System (CSPro) is a public domain software package used by hundreds of organizations and tens of thousands of individuals for entering, editing, tabulating, and disseminating census and survey data. CSPro is designed to be as user-friendly as possible, yet powerful enough to handle the most complex applications. It can be used by a wide range of people, from non-technical staff assistants to senior demographers and programmers.
CSPro supports data collection on android devices (phones and tablets). The CSEntry Android App works in collaboration with the desktop version of of CSPro.
For this workshop we will develop a little survey and we don’t touch advanced topics, due to the little time we have for our subject.
It’s important remark that CSPro have a many characteristics as mentioned on his official website. If you want to delve into other topics, there are many materials on the web.
Installation.
1- Copy the file cspro70.exe, your teacher will provide it, or download from official website here.
2.- Install the software, it’s very easy only “next”-”next”.


Select the default options.
2.- Now we have the installed software in our computer, we will see the icon in the Desktop or search on our applications.

Data
Dictionary.
3.
Launch the application, our first task on the system is to create a
“Data Dictionary”. Before we’ll do a social
experiment. Here my questionnaire:
1.
Numeric
Id or Folio
2.
Age
3. Sex
2- Female 1 – Male
4.
At what socioeconomic level do you find yourself?
1-
High level 2- Medium-high level 3-Typical-Average
4- Emerging middle level 5-Typical low level 6- Extreme low level
7- Very Extreme Low Level[2][3].
5.
Do you consider that the Mexican State chooses and has chosen the
correct economic system?
1 – Si 2-No
Why?______________________
6. Do you think that most
poor people are poor because they are lazy?
1- True 2- False.
|
4.
Choose
“Create a new application” and click on “Ok” button.

5. Now choose “Other tab” and select “Data Dictionary” and
click on “Aceptar” button.

7. It’s a good idea to create a new folder for to save this file, we will name it "LittleSurvey" both the file and the folder.

8. We have a new dictionary, now we define our questions (“fields”), types and lengths. We select the branch called (id Items). In the right of screen, we modify the “Len” (3) and “Item Name” (FOLIO), this field is used for to identify each case of our survey, we can modify this data with double click over the such field.

9.
Select the branch called “LittleSurvey record”, and the right
side of screen click
with
the right mouse button, choose “Add item” or
press <Ctrl>+<A> keys.

10.
For
now, only we will modify the “Item Label”, “Item Name” and
“Len”. For this example all fields are “Num” (numeric data)
in “Data Type”, except the specify of the question 5, that variable will be ALPHA.

11. In the field “SEX”, we add values for this item. We do double click over “SEX” item.

12.
Here add the values “Woman” value 1 and “Man” value 2. Again
click with
the right mouse button and
choose “Add Value
Set”
or
press <Ctrl>+<A> keys.

13.
With <Enter> key, we pass to “Value label” column and write
“Woman” in “From” column write 1, repeat this process for
“Man” label.

14. To display the
fields again, we select the branch “LittleSurvey record”. Repeat
the process with all fields.

15. Don’t forget,
save the data dictionary.
Data Entry.
16. Well, now we will do a new “CAPI Data Entry Application”

17. CAPI means Computer Assisted Personal Interviewing, in this
schema the interviewer uses a device for to realize the survey face
to face with the interviewee. Click on <Aceptar> button.

18. In this dialog we must enter the CAPI application name, repeat
the same name that the Data Dictionary “LittleSurvey” and click
on <Guardar> button.

19. In this dialog, select the input data dictionary, to display the
dialog for select the file from the machine folders do click in the
<...> button. Choose the LittleSurvey.dcf and click on the
<Guardar> button.

20. Once we have chosen the entry directory, we click on the <Ok>
button.

21. For this example we don’t make the forms automatically, that
is, we click on the <No> button.
Screen Main of Data Entry.

22. We have in the left side, three tabs (below) – Files, Dicts and
Forms, if we want add a new question (field) to the form, first open
the tab “Dicts” and simply we drag-and-drop over the form area.

23. We will modify the default text with click on the label and we
right-click and then we choose “Text properties”, and write
“Folio” on the dialog and click on “Ok” Button.


24. We could adding additional information using “CAPI question”.
Select the “Form” Tab; in the Forms tree, select the branch
“Little Survey identification” (green rectangle) and right-click
and choose the “View CAPI Question” option.

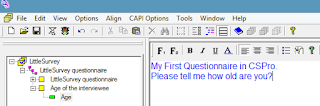
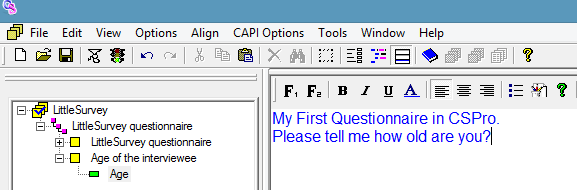
25. Here write “My First Questionnaire in CSPro”, now we have a
CAPI Question.

To return to the “View Form”, we right-click and select the “View
Form” option or click in this icon


As we want to develop an application for mobile device, due to the
size of the devices a question is recommended per screen.
Now we create the second form.
26. Select the branch “Little Survey questionnaire”, and
right-click and select “Add Form”.

In the dialog write the label for this new form “Age of the
interviewee” and click on the “OK” button.

27. Select the “Dicts” tab again, and drag-and-drop the Age
question (field) on the new form.

28. Now we add the “Question CAPI” (Remember steps 23 & 24).
Using CAPI Controls
29. Repeat the steps for add the question “Sex” inside on a new
form. Select this field, and right-click, choose the “Field
Properties”.

By default, the “Capture Type” is selected on “Radio Button”,
we only click on the “OK” button.

In the form we don’t see the changes, only it will only be
reflected in execution time, we add the “CAPI Question again”.
30. Another control is “Drop Down”, in the question
“Socio-economic level” we choose this control.

31. The next questions will design:
-
System economic – Radio Button
-
Why – Textbox
-
Reflection question – Radio Button
The application will look like this:

Test
our application.
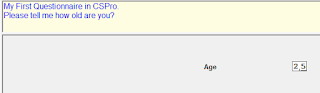
32. We click on the icon “Run”

33. We provide the
name of the database.

And we can add cases
to the survey :).Here the data entry screens:


34. Now we generate
the *.pen, an archive for data entry on Android devices. We will go
to main menu.

35. In the PlayStore (Google) we download CSEntry App.


36. Copy files
(*.pen and *.ppf) to android device via USB cable, before we must
create a new folder called Csentry.

And then we can begin to add cases in our mobile device. Here some
screenshots for the app.


And now, we make our surveys using CSPro. In the next deliveries I will show how produce results about the survey, using "Tabulation Application".
We keep reading.
Miguel Araujo
Comentarios
Publicar un comentario